

Advanced Prototyping - Week #32
Teaching gestures

This week, I should complete the basic implementation of the smart particles design, taking care of the last missing state:
`
show_anim`: the particles should morph to a detached body (or maybe just hands?) which playbacks a captured animation, inviting the player to emulate itinput: where to perform the animation, and what animation to perform
Let's go!
2024-12-30 - Revisiting motion clip management
So, what's the motion clip capture and playback situation?
If you want the full story, you need to read:
Otherwise, here's a quick summary.
I can, using the in-VR "clip management" UI I did:
capture body tracking data and save it to a motion clip
play a saved clip, optionally changing its playback speed and looping behaviour
define a selection (setting begin/end frames) on a clip and, if needed, extract it to a new clip
The idea is saving clips for the gestures I want to teach, giving them identifiers, and playing them back with a suitable skinned mesh character which is going to be part of the smart particles subsystem.
Until now, I just saved clips and played them back at the same position they had been captured, and using a specific test character (currently, the magenta particles avatar seen in week 19).
Now, I need to improve the clip playback system so that I can
play clips on different (compatible) targets
play clips at different positions/rotations and not only where they were captured
I revisited the code I wrote months ago and did a bit of refactoring. Now, the `UpperBodyClipPlayerBhv` doesn't directly apply the clip data to the test character: it applies such data to any linked node having a script inheriting from a new abstract class I defined, `AUpperBodyClipPlayerTargetBhv`.
The logic which was embedded in `UpperBodyClipPlayerBhv` got factored out to a `UpperBodyClipTestPlayerTargetBhv`, but now I will be able to reuse `UpperBodyClipPlayerBhv` to drive other setups.
Just a bit of ground work for today!
2024-12-31 - Capturing and loading hint clips
To get started, I'm going to capture a couple of motion clips showing how to open the portal and walk into it.
I'm going to define an enumeration identifying this set of motion clips.
public enum EHintClipId {
    openPortal,
    stepIntoPortal
}
Then, I'm going to capture two clips (placeholders of course, without caring that much about capturing them nicely) for these hints.
I did a single capture of opening and entering a portal, and then extracted the two clips from there:
Currently, the motion clips are stored as simple files on mass storage. That means that I would need to "manually" copy such files on the Quest file system if I want to to test a standalone build. Embedding the data in the build would be preferable.
Actually, I already solved the same problem when dealing with the level descriptions: I don't remember if I discussed the details on the DevLog, but I added a secondary data path which allows to load them from the Resources data and not only from external files.
I'm going to extend such simple system to also work with motion clips.
Done! From a quick test, the loading seems working. Tomorrow I'll setup a skinned character to be used by the hint system and play the clips on that,
2025-01-01 - New year, new skinned character
In Italy they say that what you do on the first day of the year, you’ll do all year around.
Guess what, it doesn't really work, but still, let's pretend it does and do a little work today, hoping that I'll manage to keep developing the game without too many forced breaks during the whole new year.
So, I duplicated the character setup I'm currently targeting when doing playback from the clip management UI. I changed the particles color to the same yellowish tint I configured for the placeholder VFX.
I also created another `UpperBodyClipPlayerBhv` and linked it to the new character setup.
Then, I added another subsystem to the smart particles one, naming it hint clips, which drives this hint clip player targeting the hint character. It's not that confusing.
I tested the new setup, and it works like expected.
Before working on the placement of the clip, I need to deal with the problem that I don't want the hint character to feature the full upper body, but just the arms and hands.
You might remember that to hide the legs I did a quite ugly hack: I forced the scale of the legs bones to a very small number in `LateUpdate()`. That wasn't perfect, because there's still two shiny points at the base of the legs that show up, bud I was happy enough of the solution, considering it's just temporary.
This time, unfortunately, I can't use the same trick, because this is the bones hierarchy:

I can scale down the legs and the head (scaling down the `Neck` node), but I can't scale down the chest without also affecting the arms, under the shoulders.
So, what can I do?
I went out of my comfort zone and tried using Blender to actually make an alternate version of the character FBX where I stripped the meshes of the body parts that I didn't want (keeping the skeleton untouched).

I managed to have an "arms and hands only" version of the character, and it rendered properly, but the arms and hands didn't animate well. What was wrong? I know very little about modelling and rigging, so I really don't know. But to understand if it was because of the things I had removed, I tried just importing and re-exporting the character FBX, with no modification, and that didn't work either. Is some obscure export setting configured the wrong way? A rabbit hole not worth getting into.
Time for a plan B...
Opening the model in Blender wasn't totally useless: it made me remember that the character mesh actually features three submeshes. I should have known, because I remembered dealing with three different materials attached, and AFAIK you can't have different materials without different submeshes.
To see the submeshes in the inspector, you need to select the mesh in the project tree, inside the imported FBX tree. The entry with the little cyan grid icon. In this case, I got this:
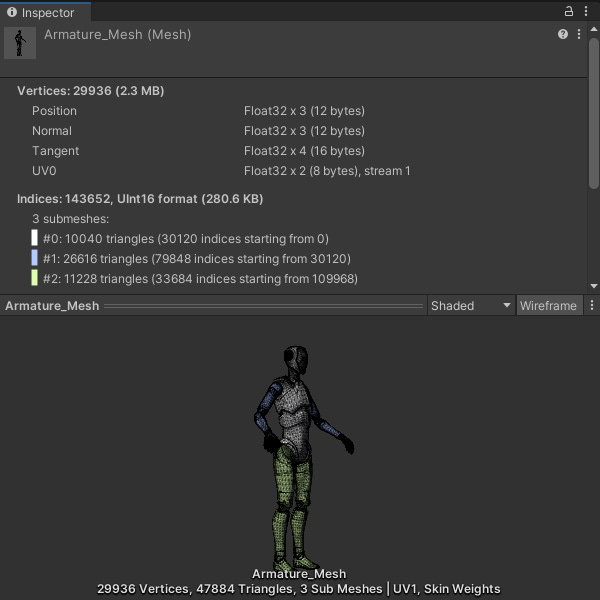
Ha! The arms are indeed a specific submesh, the blueish #1.
Let's try something...
Well, it worked. Here's a clip.
Tomorrow I'll clean up a bit the ugly hack I did, and explain what I did.
2024-01-02 - Removing submeshes
So, what did I do to only render the arms and hands of the character skinned mesh?
After realizing that what I wanted to keep was in a separated submesh, I tried to generate at runtime a new `Mesh` object, cloning the original, except for the submeshes definition, where I only kept the one I wanted.
A submesh is made of a sequence of triangles, and each triangle is defined by the indices of the three vertices that form that triangle (taken from the `vertices` array).
When you create a new `Mesh` object via code, you can specify the number of submeshes, and then the Unity `Mesh` API lets you get/set this triangles definition for each submesh via these methods:
`
int[] GetTriangles(int submesh)``
void SetTriangles(int[] triangles, int submesh)`
So, my hack leaves all the "base" mesh data unaltered (changing it but keeping it consistent might be complicated), without removing the vertices, normals etc, but changes the submeshes definition so that Unity only uses a subset of the data when rendering.
Not optimal in terms of memory use, but perfect for my prototyping purposes, as there are no visible artefacts.
And there's other good news: I can use the same approach for the other characters, where I hid the legs by scaling their bones hierarchy to `0.001` in `LateUpdate()`. Less useless work done, and no visual artefacts (the two shiny dots at the base of the invisible legs I have right now).
Refactoring and clean-up time!
This is the method I added to my character presentation script:
private static Mesh PartialClone(
        Mesh rMesh,
        int[] rSubmeshesToKeep) {
    Mesh rNewMesh = new Mesh {
        subMeshCount = rSubmeshesToKeep.Length
    };
    rNewMesh.vertices = (Vector3[])rMesh.vertices.Clone();
    rNewMesh.normals = (Vector3[])rMesh.normals.Clone();
    rNewMesh.uv = (Vector2[])rMesh.uv.Clone();
    rNewMesh.colors = (Color[])rMesh.colors.Clone();
    rNewMesh.tangents = (Vector4[])rMesh.tangents.Clone();
    rNewMesh.boneWeights = (BoneWeight[])rMesh.boneWeights.Clone();
    rNewMesh.bindposes = (Matrix4x4[])rMesh.bindposes.Clone();

    int iNewMeshSubmeshesIdx = 0;
    foreach (int iSubmeshToKeepIdx in rSubmeshesToKeep) {
        int[] rTriangles =
            (int[]) rMesh.GetTriangles(iSubmeshToKeepIdx).Clone();
        rNewMesh.SetTriangles(rTriangles, iNewMeshSubmeshesIdx);
        ++iNewMeshSubmeshesIdx;
    }

    rNewMesh.RecalculateBounds();
    rNewMesh.RecalculateNormals();
    return rNewMesh;
}
I didn't check if I could avoid cloning the mesh data (I probably could), but let's stay on the safe side, considering it's just a temporary fix for a temporary character mesh.
Then, I exposed a `m_submeshesSetup` setting to the inspector, to configure what kind of visualization I want for each character instance:
public enum ESubmeshesSetup {
    FullBody,
    UpperBody,
    ArmsOnly
}

[SerializeField] private ESubmeshesSetup m_submeshesSetup;
Finally, in `Awake()`, I called the `PartialClone` method indicating what submeshes to keep depending on the configured value.
const int iBODY_SUBMESH_IDX = 0;
const int iARMS_SUBMESH_IDX = 1;
const int iLEGS_SUBMESH_IDX = 2;

protected virtual void Awake() {
    if (m_submeshSetup == ESubmeshSetup.UpperBody) {
        m_rSkinnedMeshRenderer.sharedMesh = PartialClone(
            m_rSkinnedMeshRenderer.sharedMesh,
            new int[] { iBODY_SUBMESH_IDX, iARMS_SUBMESH_IDX }
        );
    } else if (m_submeshSetup == ESubmeshSetup.ArmsOnly) {
        m_rSkinnedMeshRenderer.sharedMesh = PartialClone(
            m_rSkinnedMeshRenderer.sharedMesh,
            new int[] { iARMS_SUBMESH_IDX }
        );
    } // else do nothing and keep the full body mesh
}
Sometimes, you solve a basic problem in a stupid-simple way, and then are presented with a more complex version of the same problem which pushes you to find a less naïve solution. If feels nice when that new solution also provides a better solution for the original, basic problem. That's what happened this time, with the removal of the legs scaling hack and its artefacts.
2024-01-03 - Placing hint clips
So, we have a way to load, identify and play on a special "arms only" character some motion clips.
It's time to properly place them in the game world.
Honestly, I'm not sure if I want to show them
into "ideal" positions, like relative to a spot (as we defined it in week 31, so a platform location and a platform slice identifier)
according to the current player position and orientation, so that they can basically "match" the hint clip with their hands
There's another problem to take into account: players have a different stature.
Ideally, I would want to "transpose" a captured animation to the hint character but using the bones size derived from the live tracking data, so that the animation adapts to the actual player stature. This feels a bit overkill, especially considering the current stage of development, but I wrote down a note about looking into it at some point in my "polishing / improvements" notes.
Instead, to keep it simple, I will just scale the hint character a bit according to the detected player height and - as I'm doing the captures - mine (`1.75m`).
For example, if I detect that the player height is `1.90m`, I will set the hint character scaling to `1.90 / 1.75 = 1.085`, if it's `1.60m` the scale will be instead `1.60 / 1.75 = 0.914`.
This is a common approach in XR development, and if you're surprised that a uniform scaling can work pretty well, consider that the width of the arm span of a person is roughly the same as their height, as shown by the square in the Vitruvian Man.
Coding time!
I proceeded without significant problems. For now, I decided to use the spot identification system to place the hints character. I'll probably add other options along the way.
I wrote a bit of code to take care of the character scaling depending on the player height, and tested that it affects the character correctly. That said, the feature is incomplete, because I don't have a calibration sequence yet, so I don't have the correct value for the player height. I tried calculating a kind of "continuously adjusting average height", but I didn't like the result, so I scrapped it. Instead, I wrote a nice `// TODO` into the method implementation to calculate the scale, and had it return `1.0f`.
Here's a short clip where I test the placement of the hint animation via inspector:
And week 32 is done too. I'm now able to show hint clips with adequate in-game placement.
I should finally have all the pieces I need to implement the tutorial sequence I described in week 25... so, don't miss the next article!